7.31.2011

Up North: Black Cherry and Pecan Ice Cream


We were a family of boaters and when I was younger we spent part of every summer on the Great Lakes, Georgian Bay and in the Little Traverse Bay area. The latter meant we saw a lot of the busy summer resort towns of Petoskey, Charlevoix and Harbour Springs. There are several restaurants and hotels in those three towns owned by Staffords and over the years we've enjoyed eating and staying at every one of them. When I go up now, I usually stay in Petoskey at Stafford's  Bay View Inn. 


A candy and ice cream company you may be familiar with named 
Kilwins (which has been around since the 40's) used to make a very special ice cream only for the Stafford establishments: Black Cherry. Staffords became famous for it. It was ambrosial and we always saved room for dessert when we visited any of their restaurants. Still do. As far back as I can remember, everyone in my family looked forward to a dish of that ice cream (particularly my dad).

A few years ago, when my sister and I were lunching at the Stafford's Weathervane restaurant in Charlevoix, we got into a conversation with the manager and asked why we had never been able to buy a cone of that wonderful ice cream at Kilwin's in town. He told us that Kilwin's, after many years, asked the same question; indeed, they wanted to offer it to their customers, who had been asking for it for ages. Of course, I have no idea what Stafford's contract with Kilwin's was, but we were informed by the manager that the Kilwin/Stafford black cherry ice cream arrangement was over. Staffords turned to a company in the Traverse City area and asked if they would make it for them. Perhaps Staffords owns the recipe? I have no idea. As far as I know, the Traverse City company still does the supplying. And it's every bit as fabulous as it ever was.


So, if you happen to be up north near a Staffords establishment, be sure to order their black cherry ice cream for dessert. If you're near a Kilwin's, you can now buy their version of  it, but I'm quite sure it's not the same as the black cherry Stafford's serves. 
Because Florida beggars can't be choosers, when Kilwin's opened in my area, I kept my fingers crossed; their black cherry was perhaps close enough to the original.....satisfaction might be at hand. Or so I thought. Guess what? They don't carry black cherry in their Florida stores at all!  Ever.  :(  

Lately I've been experimenting with different recipes and finally came up with one I really like, but trust me when I say....it's just not the same. Could it be nothing tastes as good as it does when I'm in northern Michigan? After all, we must factor memories in with that ice cream and Stafford's black cherry has many years of happy memories attached to it. At any rate, this is as good as it's going to get until I  visit the north country again.


Black Cherry Ice Cream with Toasted Pecans


Ingredients:
For the cherries:
1 pound fresh black cherries
1 1/2 cups water
1 cup sugar
a squeeze of lemon juice

For the ice cream:

1  cup half and half
2 cups heavy cream
1 (14 oz.) can sweetened condensed milk
1 tablespoon vanilla bean paste
1 cup cherries, prepared as directed below
3/4 cup toasted pecans, roughly chopped
red food coloring, optional

Method:
Stem and pit the cherries and place in a saucepan with the water and sugar. Bring to a boil and simmer for 25 minutes. Stir frequently. Remove from heat and add the lemon juice.

Cool. You can keep refrigerated for a couple weeks if you wish.
When ready to use, let the cherries drain in a sieve. (You can use the leftover syrup in drinks.) Chop the cherries.
In a bowl, whisk the creams and sweetened condensed milk well. Add the chopped cherries and pecans and, if you like your ice cream a definite pink, a drop of food gel.

Freeze according to manufacturers directions.

7.28.2011

Raspberry Muffins


Flour is the most divine cookbook, isn't it? I'd like to do a Julie/Julia thing with it, but I know my limitations. :) On the other hand, I often turn to Joanne Chang for ideas and inspiration.
 

Recently I was reading Food 52  (which I hope you know about and at least read if you haven't joined) and someone had made an adaptation of Chang's Raspberry Rhubarb muffins. Because I have that treasured copy of Flour I looked it up to see what changes were made. I liked both the adaptations: browning the butter can't help but improve the flavor of the muffins and the Food 52 recipe used buttermilk instead of Chang's milk. Sounded good to me. 
I've always thought Chang's use of crème fraiche in her batter was a clever idea so I didn't hesitate to combine that with the buttermilk. I didn't have any rhubarb, so I added an extra half cup of raspberries. (BTW, the Food 52 recipe is HERE.)

Not too sweet, which I like in a muffin, and they were moist and tender. Served warm with butter, you can't beat them for Sunday brunch. If you have rhubarb in your garden, use a cup of fresh raspberries and a cup of chopped fresh rhubarb. 

Chang suggests filling the muffin liners right to the top and the image displayed in the book has HUGE overflowing muffin tops. Like mushrooms. I decided to use two kinds of paper liners that are deeper than normal, so only filled mine 3/4 full. They could have taken a bit more. So if you're using regular liners, fill them almost to the top.

Joanne Chang's Raspberry Muffins

From Flour and Food 52


Ingredients:
5 tablespoons unsalted butter

1 3/4 cup all purpose flour
2 teaspoons baking powder
1/4 teaspoon baking soda
1/4 teaspoon sea salt
3/4 cup sugar
1/2 cup milk or buttermilk, room temperature
1/2 cup crème fraiche, room temperature
1 large egg, room temperature
1 egg yolk, room temperature
1 teaspoon vanilla bean paste (or vanilla extract)
1 1/2 cups fresh raspberries

Method:
Melt the butter and allow to brown. Watch carefully, as it burns quickly after a certain point. Set aside to cool to room temperature.

Preheat oven to 350°. Line your muffin tin with paper liners.
Sift together the flour, baking powder, baking soda, and salt. In another bowl, mix the sugar, buttermilk and c
rème fraiche. Add the eggs and egg yolk and mix until blended. Then add the browned butter and vanilla bean paste.
Fold in the flour mixture and add the raspberries when it is still not completely combined. Mix until all the dry ingredients are gone, but do not overmix.

Spoon into your muffin cups and bake for about 25  minutes or until a baking tester comes out clean. This recipe made 12 muffins.
Cool on a rack, if you can bear to allow them to cool!  :)


7.25.2011

Israeli Couscous with Olives and Roasted Tomatoes


Israeli couscous is also known as ptitim. It was
 invented during the austerity period in Israel, when rice was scarce. (I was surprised to read it's mainly a children's dish in Israel. Certainly not the case here, where it's considered a "gourmet" item.) It's made of semolina pellets about the size of peppercorns. The little balls are much chewier than the smallest (Moroccan) couscous and holds up better to sauces- even in a cold salad—there's no mush. I read a quote recently comparing Israeli couscous to Moroccan couscous: " It's akin to the difference between steel-cut oats and quick-cook oatmeal, but maybe even more extreme." 

I had seen this recipe using Israeli couscous in Gourmet magazine, cut it out and then it languished in my file. When I recently walked into Williams Sonoma and saw a display of all three kinds of couscous, I remembered the recipe, bought the Israeli couscous and gave it a try.
 

The tomato vinaigrette was marvelous. Roasting tomatoes always gives them such a wonderful depth of flavor. I've done it many times to make my caprese salad, but it never occurred to me to make a vinaigrette with them. As it happened, I took this dish to a pot luck lunch. Nobody had ever eaten anything like it, everyone loved it and asked where to buy the couscous. They'd only made dishes with the Moroccan type. This was such a success, I'm going to try the Lebanese couscous next. Any favorite recipes out there?

Israeli Couscous with Olives and Roasted Tomatoes
Gourmet, September 2002


Ingredients:


For roasted tomatoes and dressing:

2 pints red grape or cherry tomatoes (1 1/2 lb)
3 large garlic cloves, left unpeeled
1/4 cup extra-virgin olive oil
1/4 cup warm water
1 teaspoon fresh lemon juice
1 teaspoon salt
1/4 teaspoon black pepper

For couscous:

2 and 3/4 cups chicken broth
2 and 1/4 cups Israeli couscous
1 tablespoon olive oil
1/2 cup Kalamata or other brine-cured black olives, pitted and chopped
1/3 cup chopped fresh flat-leaf parsley
1/4 cup chopped fresh mint
1 teaspoon chopped fresh thyme

Method
:


To roast tomatoes and make dressing: 

Preheat oven to 250°F. 
Halve tomatoes through stem ends and arrange, cut sides up, in 1 layer in a large shallow (1-inch-deep) baking pan. Add garlic to pan and roast in middle of oven until tomatoes are slightly shriveled around edges, about 1 hour. Cool in pan on a rack 30 minutes. 
Peel garlic and puree with oil, water, lemon juice, salt, pepper, and 1/2 cup of the roasted tomatoes (reserve the rest) in a blender until dressing is very smooth. 

Make the couscous:
 
Bring broth to a boil in a 3-quart heavy saucepan and stir in couscous, then simmer, uncovered, 6 minutes. Cover pan and remove from heat. Let stand 10 minutes. Spread couscous in 1 layer on a baking sheet and cool 15 minutes. 

Put it all together:
Transfer 
couscous to a bowl and stir in the olives, parsley,  mint and thyme, the dressing, the reserved roasted tomatoes and salt and pepper to taste. Serves 6.

Do ahead: Roasted tomatoes, dressing, and couscous can be made 1 day ahead and 
kept separately, covered and chilled. Bring to room temperature before proceeding.

7.22.2011

Apricot Tart


Can you handle just one more fruit dessert? Grab some fresh apricots next trip to the market and make this divine tart. My favorite fruit dessert this summer. So far anyway. Of course, like so many of my other favorite pastries, this recipe comes from Pastry Studio. I made it in a rectangular pan with a removable bottom, but you could make it in individual tart pans or a large round one.


I do have one piece of advice: I suggest you follow the directions more carefully than I did for making the crumb base/topping. Do not over mix!
I let the machine go a bit too long and got more of a dough than a crumble. Stop the food processor when it's still crumbly. (Not that my tart wasn't delicious anyway but it's supposed to look like this.....a cornmeal CRUMB tart!) You can always do the final tossing by hand.
The tart isn't overly sweet so you might want to have some ice cream or sweetened whipped cream handy for any guests or family with a decided sweet tooth. I loved it just the way it was. I like a tart tart. Hah! You know what I mean.


Apricot Cornmeal Crumb (sort of) Tart
From Pastry Studio


Ingredients for the crumble:
8 fresh ripe apricots
1/4 cup water (yes, I know it doesn't sound like enough, but it is)
1/4 C + 2 T sugar
1/2 vanilla bean (I used 1/2 teaspoon vanilla bean paste)
pinch of cinnamon

Ingredients for the filling:
2 cups flour
1/4 cup + 2 tablespoons fine cornmeal
3/4 cup sugar
1/4 teaspoon plus 1/8 teaspoon salt
6 oz (1 1/2 sticks) cold butter, cut into small pieces
3 egg yolks
1/4 cup + 2 tablespoons sour cream

Method:
Cut the apricots in half and remove the pits. Combine the water and sugar together and bring to a simmer. Split and seed the vanilla bean (or add the vanilla bean paste) and add to the syrup along with the apricots and the cinnamon. Lower the heat to a low simmer and cook the mixture until the apricots start to look a bit like jam but still hold their shape. Take off the heat and pour into a strainer placed over a bowl to drain. Set aside to cool.

Preheat oven to 350 degrees.

Whisk together the flour, cornmeal, sugar and salt and place in a food processor. Add the butter pieces and pulse just enough to begin to break the butter up into smallish pieces. Mix the yolks and sour cream together and add to the food processor. Pulse just a few times until the mixture looks like it’s coming together but is still rather crumbly. Do not over mix. Pour into a large bowl and toss gently with your hands.

Place about 2/3 of the dough crumbles into a 9” tart pan with the bottom lined with parchment. Gently spread an even layer to the edges and press lightly without compressing it too much. (Because I had dough at this point and not crumble, I was forced to press it more into a crust and I also pushed it up the sides a bit.) Cover the bottom of the pan completely so there aren’t any holes. Layer the cooled apricots evenly on top, leaving about a little border around the edge. Sprinkle the remaining dough crumble over the top of the apricots. Be sure to spread some out to the edges of the tart pan to form a border. 

Place the tart on a sheet pan lined with parchment and bake for about 35 minutes. Cool completely before removing from the tart pan to serve.


7.19.2011

Cherry Almond Crumble


Gosh, another dessert with fruit. I can't resist. Aren't you loving the black cherries in the market? I confess, I do hate pitting them though; I even wear plastic gloves and an apron (unheard of for me) 'cause they stain so. But desserts like this one make it well worth the time and mess. Imagine my surprise to find I had all the ingredients for this dish already in my kitchen! That never happens. You're going to love the crunchy topping (always the first thing I eat) and the dark brown sugar in the cherry 
mixture provides some lovely depth in flavor.

Cherry Almond Crumble
From Rustic Fruit Desserts via Hannah from Honey and Jam


Ingredients:

Crumble:

3/4 cup all purpose flour
1/2 cup old fashioned rolled oats
1/2 cup packed light brown sugar
3/4 cup sliced almonds
1/2 teaspoon fine sea salt
1/2 cup unsalted butter, melted


Cherry Filling:
1 1/2 pounds fresh cherries, pitted
1/3 cup dark brown sugar (more or less, depending on your taste)
1/2 teaspoon almond extract
1 tablespoon cornstarch

Method:
Preheat the oven to 350. Butter whichever baking dishes you are going to use. I used individual oval ones.
Mix the flour, oats, brown sugar, almonds and salt together in a bowl. Add the butter, and with your hands, crumble it together until well mixed.
Mix together the cherries, dark brown sugar, almond extract and cornstarch.
Pour the cherry mixture into the buttered dishes and then crumble the topping over the cherries. Bake 45  minutes or until the topping is golden brown and you can see the filling bubbling around the sides.


7.16.2011

Buckwheat Stone Fruit Shortcake


There's always some buckwheat flour in my pantry because of our love for Grandpa's buckwheat pancakes
So when I saw this recipe for buckwheat shortcake in Alice Medrich's book, I was intrigued. Then white peaches arrived in the market, I couldn't resist so decided to make the shortcake using stone fruit with raspberries rather than the traditional strawberries. The peaches were sweet and the juices from the fruit soaked into the bottom layer of the shortcake while the top stayed a bit crunchy. On top of that, this is the easiest shortcake I've ever made. In one bowl and it only took a couple minutes to throw together and ten to bake.  Dessert can be ready in a flash. I added a little confectioners sugar to the whipped cream and it really did need that touch of sweet. 
It turned out to be a lovely change from the ordinary shortcake. It even looks wholesome and healthy doesn't it? And it tasted even better than Mother's  shortcake, which I've been making for years. 

Buckwheat Shortcake

From  Pure Dessert by Alice Medrich


Ingredients:
1 cup plus 2 tablespoons all purpose flour (5 ounces)
1/4 cup plus 2 tablespoons buckwheat flour (1.7 ounces)
1/4 cup sugar plus extra for sprinkling
1 1/2 teaspoons baking powder
1/2 teaspoon salt
1 cup heavy cream

Method:
Preheat oven to 425. Prepare a baking sheet lined with a double layer of parchment paper.
In a bowl, whisk together everything but the heavy cream. Make a well in the center and pour in the cream. Incorporate slowly with a rubber spatula by pushing the dry ingredients into the center, cutting and turning until the dry ingredients are moistened. The dough should look shaggy and rough. Gather the dough into a ball and knead it gently against the side of the bowl a few times.
Turn the dough out on a floured counter and roll out to a square about 3/4 inch thick. Cut out in whatever shape you prefer, place on the parchment paper. Dip a brush into the cup that held the cream and brush the leftover cream on the tops of the shortbread. Sprinkle with sugar and bake for 12 to 15 minute. Cool on a rack. (Made about 6 square shortcakes.)

Filling for the shortbread:

Ingredients:

5 medium plums, pitted, cut into 1/2-inch pieces
2 large peaches, pitted, cut into 1/2-inch pieces
1 1/2-pint basket raspberries
1/3 cup sugar
1 cup chilled whipping cream
1/4 cup powdered sugar
1 teaspoon vanilla bean paste (or extract)
Additional powdered sugar

Method:

Toss plums, peaches, raspberries and 1/3 cup sugar in large bowl. Let stand 30 minutes.  Beat the
 whipping cream, 1/4 cup powdered sugar and vanilla in large bowl until firm peaks form. Refrigerate until ready to use. 

7.13.2011

French Polynesian Adventure IV: Bora Bora


For Part One of this series, check HERE.
For Part Two of this series, check THIS.
For Part Three of this series, check HERE.

Bora Bora

The view of Bora Bora from the air is truly breathtaking.  As we were landing, there was water quite close to the runway on both sides. The airport, built by the US forces in 1942, is located on a palm fringed motu about 20 minutes by boat from the main village of Vaitape. Of course, the landing merely added to the thrill of finally arriving on Bora Bora. Just the name itself conjures up magic, doesn't it? Everyone on the plane was excited. And no matter where you're staying on Bora Bora, after the plane lands on that little spit of land, you have to take a boat to your hotel.


The island, located about 230 kilometres (140 mi) northwest of Papeete, is surrounded by a lagoon and a barrier reef. In the center of the island are the remnants of an extinct volcano rising to two peaks, Mount Pahia and Mount Otemanu, the highest point at 727 metres (2,385 ft). The permanent population of Bora Bora is 8,880. Most of the temples (Marae) have been destroyed during the last century by the English missionaries, and unfortunately there are little archeological remnants left.

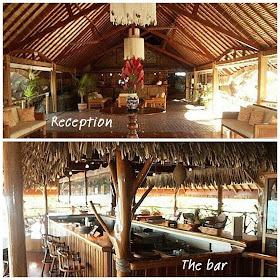
We stayed at the Hotel Bora Bora. It's an Aman resort. We took some razzing from friends we traveled over with, but we didn't care...it was worth the splurge! As with so many hotels here, I see on their website they are remodeling. Not that I thought they needed it, as we loved our bungalow. So some of my photos might be dated. This time, we weren't overwater, but  it didn't bother us a bit. You'll understand after you see the slideshow. I mean, how elegant can a bungalow get?

Photobucket
The main village is Vaitape and is set at the foot of Mount Pahia. It is the island’s commercial and administrative centre. There is just one main road around the island, and it goes through Vaitape, past assorted churches whose bells peal loudly on Sundays. No stoplights though there is a stop sign. Complimentary shuttle from Hotel Bora Bora to town was available once a day.

Of course, who could resist lunch at Bloody Mary's? Tracy is standing by a plaque listing all the famous visitors. (BTW: the place was jammed with cruise ship passengers.) And why is she pointing to Pierce Brosnan's name? Well, there's a bit of a story behind that.


The second day we were there, we noticed extra security. Someone soon told us Pierce Brosnan had arrived. Ta Da! We were given to understand he and his family are frequent guests at this hotel. Everyone practically fell down groveling. Not that we were completely ignored, but close. We did see he and his wife in the hotel bar a couple times but noticed they didn't eat there. I don't blame them, the food was ghastly. We actually complained. An Aman resort with bad food?? Hard to believe.

 Because we hadn't read or heard about any special restaurants here, we asked one of the employees where on earth the Brosnans were eating and she told us about a lovely restaurant....supposedly with an excellent chef, the best (and practically only... at that time anyway) one in the area. When we called for reservations, we were told Mr. Brosnan took over the restaurant and reservations were closed. As they were only open several days a week and we were only on the island for 5 days, we never did have the opportunity to eat there. We suffered through the bad dinners at Hotel Bora Bora, thanks to Mr. Brosnan. There was, of course, a joint or two in town, but neither of us were so inclined. I sincerely hope something will be done about the hotel's chef during this remodel. (Moorea and Bora Bora both left a lot to be desired in the culinary arts department.)


Tracy's diving departed from the hotel.  She had 
the following comments about diving locations:
Manta Ray Dance: a very cloudy day but saw plenty of mantas
Tupitipiti Point: lots of dolphins
 
The White Valley: again, lots of dolphins
She did not see any leopard rays at the one area where they frequent.
Snorkeling was fairly good here and Tracy took me snorkeling to a wall that scared the life out of me. I thought the bottom was dropping out (it was) and it's very disorienting when you can't see the bottom at all. We saw both turtles and rays while snorkeling.
A few more photos:


We discovered lots of shops and boutiques scattered about the island. Always ask for shopping information at reception and any staff you speak with. There are hidden gems only they know about. We would never have discovered one fabulous little jewelry boutique with unusual island pieces if we hadn't asked someone for suggestions. It was quite out of the way. Take a look at this little necklace. (I enlarged the photo so you could see the intricate work.) It's hand made with a coconut fiber called coir. It's not just a single piece, but thin strands are wound round and around. The necklace is a really small piece but the coir work is extremely intricate. Unfortunately, most things at this particular shop were terribly expensive because they were so work-intensive, but each of us bought a simple necklace. The bottom photo was a funky (and cheap) ankle bracelet. One of the shells hooks into the loop to keep it attached. I wear it often in the islands on the beach.


 We discovered a gallery that had some lovely things. The tray with the bare-breasted woman has thin glass liner over the art work and is only about 1 foot long. She hangs on a wall in my den.


And in the same gallery, off in a corner, a basket contained some tightly rolled up drawings on coconut husks. I couldn't resist, brought three home and had them framed.


I'm not going to list names of shops because things change so quickly and it's been a few years; I imagine the shopping (and hopefully the food) has been improved even more. After all, Bora Bora is a cruise ship stop; that ought to warrant expansion.


So all in all, shopping is fun on this island....and also at our hotel. We loved our bungalow and for the first time on this trip took advantage of the wonderful spa. It's a shame our dinners weren't good. We had made friends with the manager and after hearing what we thought, actually said: "food is not that important to our guests." What a wrong-headed comment!  I don't know, is it because we're both foodies? Or perhaps honeymooners don't really care about food :), but there weren't very many honeymooners at this particular resort. I imagine it's difficult to find chefs for these out-of-the-way islands, although our first two had excellent food and so did our final stop:  Taha'a.

7.10.2011

Long Island Iced Tea Sorbet


Ahhhhh. Don't you love a lovely glass of iced tea?


But here's something better, and there's not a speck of tea in this iced tea either, honey.
So what's up with that? 
In 1976, a bartender named Robert “Rosebud” Butt at the Oak Beach Inn of Hampton Bays, Long Island, N.Y., threw together equal parts vodka, gin, rum, tequila and triple sec, plus a little cola to give it a tea-like color and invented Long Island Iced Tea. By the mid-1980s, the popularity of Butt’s invention far outweighed that of his last name (poor man), and had become hugely popular, especially among college-age drinkers.....traditionally around the time of spring break. Supposedly, the beverage allows covert drinkers to imbibe with a concoction that still looks as though it were non-alcoholic, just in case family were to arrive and catch you sipping the thing. A warning from the experience of age: it may look innocuous, but trust me, Long Island Teas aren’t for the faint of heart or amateur drinkers. They're deadly. There are lots of versions but here's the recipe we used to use:

3 parts Triple Sec
1 part Light Rum
1 part Dark Myers Rum
1 part Vodka
1 part Gin
1 part Vermouth
3 parts Sweet & Sour Mixer 
6 parts Coca Cola (like Classic; do not use Pepsi!)
1/2 part Tequila 
Ice

Oh the memories.  I'd probably drop on the spot if I had one now. :)
So I was thumbing through Marcel Desaulniers' lovely book
Desserts To Die For and was intrigued to find those memories in sorbet form. And here it is, in all its glory....Long Island Iced Tea....frozen. Definitely an apt sorbet in a book with that title. My oh my.

Long Island Iced Tea Sorbet

From Desserts To Die For by Marcel Desaulniers


Ingredients:

1 1/2 cups granulated sugar
1 cup Myers dark rum
1 cup good quality tequila
1/2 cup fresh lemon juice
1/4 cup Rose's lime juice
1 teaspoon finely grated lemon zest
1 teaspoon finely grated lime zest
12 ounces Coca Cola Classic
1 1/2 cups cold water
1/4 cup Kahlua


Method:

Heat the sugar, rum, tequila, lemon and lime juice and zests in a saucepan. Bring to a boil, stirring to dissolve sugar. Reduce heat a bit and allow to boil for 13 minutes. You should have about 2 1/4 cups syrupy spiked tea. (At this point, your entire house will smell as though you've had a very big party.)
Cool the mixture over an ice bath until it is 40 to 45 degrees. (About 15 minutes) When chilled add cola, water and Kahlua.
Freeze in your ice cream freezer. Place the semifrozen sorbet into a container and freeze for several hours before serving. It will never freeze completely hard. Serve with a mint sprig and a slice of lime. Serve within 24 hours.

7.08.2011

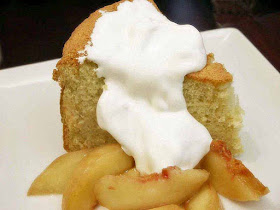
Sauternes Chiffon Cake with Boozy Peaches


One of my favorite summer cakes has always been an orange chiffon my mother used to make. And my Aunt Mar's chiffon birthday cake runs a close second. But I think they are both about to be moved down the list as this chiffon cake made with Sauternes ought to have the word elegant in the title. It's light as a cloud, tastes like manna from heaven and is amazingly versatile. Let me count the ways: the cake alone; the cake with Grand Marnier flavored whipped cream; the peaches alone with whipped cream; the peaches over vanilla bean ice cream; and of course the best: the cake with the peaches plus whipped cream.
Please note: the peaches must be made the day before and while you may be tempted to try other fruit with it, try it with the peaches first. (recipe follows) I've never made a chiffon cake in anything but an angel food cake pan and while this cake looked as though it was going to spill over the springform pan, it didn't. Barely.

I'm sure you've all visited Darjeeling Dreams. Joyti's blog is wonderful, her presentations  are so creative and the recipes are such fun to read about. This recipe is no exception....it's a HUGE summer winner.

Sauternes Chiffon Cake with Ina's Sauternes Peaches

Adapted from HERE


Ingredients:
7 large eggs, separated and at room temperature
2/3 cup sugar, divided into halves
1/2 cup sugar
pinch salt
1/2 tsp salt
2 tbsp oil, canola or olive
1/2 cup good quality Sauternes 
1 tbsp baking powder
3.5 ounces (1 scant cup) all purpose flour, sifted

Method: 

Preheat oven to 325°F. Prepare a 9-inch springform pan by greasing it well and lining the bottom with parchment paper. (You'll find the cake rises to the top. So be sure to grease the sides all the way to the top.)
In a medium bowl, whip together egg yolks, salt and 1/3 cup of sugar until pale. Slowly whisk in the oil, then the wine.
Place the egg whites in the bowl of a stand mixture fitted with a whisk attachment. Add the 1/2 cup of sugar and the pinch of salt, and whip  until soft peaks form. Add 1/3 cup of sugar and continue beating until stiff peaks form.

Sift the baking powder with the flour and set aside. Pour half of yolk mixture over the whites, and sprinkle half of flour mixture over this. Gently fold together, being careful that the whites do not lose volume. Repeat with remaining halves.

Pour batter into prepared pan and bake for approximately 25 minutes, or until the top has browned. Turn the temperature of oven down to 300°F, and continue to bake for 15-20 minutes, or until cake tester inserted into the center comes out clean. (It took me longer than the time indicated.)
Cook the cake on a rack. You'll find that it falls a bit in the center. That's fine.


Serve with
Ina Garten's Sauternes peaches. You'll love these peaches all by themselves with just a little whipped cream on top.

Ingredients:
6 to 8 very ripe yellow or white peaches
3 tablespoons sugar
1 (375 ml.) bottle good Sauternes ( I just used the remainder of my sauternes from the cake.)
1 tablespoon orange-flavored liqueur (recommended: Grand Marnier)

Directions:
Bring a pot of water to a boil and immerse the peaches in the water for 1 to 2 minutes, until the skins come off easily. Remove them with a slotted spoon and place them in a bowl of cold water to stop the cooking. Peel the peaches and then slice them in wedges off the pit and into a bowl. Stir in the sugar, Sauternes, and orange liqueur. Cover and refrigerate for at least 2 hours, or overnight. Serve cool but not cold.

7.04.2011

Fiddling Around


Every year in late spring or very early summer, I read something or other about fiddlehead ferns. One of the articles mentioned they grow wild in New England along mossy stream banks. That kind of lets Florida out, or so I thought until I found them in both the Fresh Market and Whole Foods. So I brought some home, did more reading and made them for dinner the other night.


So what are they exactly?
They are the immature leaf fronds of ostrich fern plants that have not yet opened. Fern leaves are poisonous once they open and can only be enjoyed in this early stage. 
What do they taste like? A cross between artichokes and asparagus, kind of earthy and nutty.
Where do you find them? The ostrich fern is native to the northeast as well as to the upper Midwestern states. Ostrich fern also grows freely in Alaska and in many parts of Canada. It is grown in the Northwest where wild-food enthusiasts consider it high on the culinary list. Ostrich fern will grow in the home garden in regions with moderate to cold winters and mild summers. It does not do well in areas that remain warm year round. The winter chill period is important to the growth cycle of this fern.

So, look for them in late spring and very early summer. Fiddlehead ferns are only available for a short time, so grab them while you can. Because Florida does not have fiddlehead ferns growing by mossy stream banks or anyplace else, I looked to see where mine came from. The label said: Alpine Foragers Exchange Inc. in Portland Oregon. That's a long trip from Oregon to Florida for sure. I'm rather surprised someone in New England isn't supplying them, but maybe the prices are higher or perhaps nobody's thought of it.

I also read they are fabulous served with morels, which you lucky northerners can forage for at just about the same time. Those two earthy flavors combined must be a gourmand's dream. I think next spring I'm going to splurge and buy some dried morels just so I can taste these two together. But if you love mushrooms and don't want to spring for morels, use shiitakes or any other commonly available mushroom.

How to prepare them for cooking? If more than 2 inches of stem remains attached beyond the coiled part of the fiddlehead snap or cut it off. If any of the paper chaff remains on the fiddleheads you may rub it off by hand. I rinsed them in water and used a soft brush to get the chaff off. After the chaff is removed wash the fiddleheads in several changes of cold water to remove any dirt or grit. Drain the fiddlehead completely. Use them fresh as soon after harvest as possible.
When I made them, I got some salted boiling water going and parboiled them for a couple minutes. Not long, because you don't want them soft. Put them in an ice bath and then dry them completely. The first time, I fried them along with some shallots and garlic and seasoned them with salt and pepper, eating them as a vegetable. Double yum, people. 
Then I read Mary's blog.... Ocean Breezes, Country Sneezes and she had made them with pancetta, something I noticed a few other recipes suggested. Mary also mentioned you can freeze them. I'll try that next year, although I should think getting them absolutely fresh (which I can't) would be key to successful freezing.

The next night, because I had some angel hair pasta, I cooked that and at the same time, browned some pancetta, browned shallots and garlic with the parboiled fiddleheads, tossed it with the pasta and topped with a bit of Parmesan. Oh Lord. Deeee-vine. 

But next time, I'm using bacon which would be just as good if not better (and I almost always have some in the fridge), and mushrooms. Morels would be perfect if I could get them, which I can't, darn it, but we already discussed that. Next spring, if you find fiddleheads in your market or if you can forage for them, take some home. Make them with bacon and mushrooms. What a treat. 
So here's the recipe...with by-the-seat-of-your-pants instructions;  a combination of several recipes. 

Fiddlehead Ferns with Pancetta


Ingredients:

Fiddlehead ferns
Pancetta, 1/4 inch thick, diced (or bacon)
1 garlic clove, minced

1 shallot, diced
pasta, your choice
Parmesan
mushrooms, morels if you're lucky (optional)

Method:
Clean the fiddleheads as described above. Boil them in salted water for a couple minutes, then plunge them into an ice bath to stop the cooking.
Dry thoroughly. Brown the diced pancetta and remove from pan onto paper towels. I discarded the grease, wiped the pan and added some butter. Add the shallots, garlic and fiddleheads. Brown them lightly and then add the pancetta.
Cook your pasta as desired, drain and toss with the fiddlehead/shallot mixture. Top with some Parmesan and serve.